How to use Dictation on macOS Ventura?
If you are searching or wondering about how to use dictation on macOS Ventura, then do not wonder anywhere. Here you will get all the details about how to use macOS Ventura for your dictating text, and how to enable dictation on macOS Ventura and etc. The Dictation feature in Apple’s macOS Ventura is a little different than it was when it first appeared. Here’s how to activate it and get started with what it can do.
Dictation enables you to dictate text into any text field in which you can enter. This function is useful for quickly composing an email, but it has many more applications – the sky’s the limit. However, you must first turn it on.
How to begin dictating in macOS Ventura?
1. First of all, Click where you want to place your text on your Mac in an app.
2. Dictation can be activated by either pressing the dictation button on your keyboard
3. After that, selecting Start Dictation from the Edit menu.
4. When the microphone displays on screen, speak your text clearly.
5. When you’re finished, press the return key.
You can dictate for as long as you want, however the feature will turn off after 30 seconds of silence. As you dictate, Dictation automatically inserts punctuation such as commas, periods, and question marks.
You can insert different punctuation marks by just saying the punctuation mark’s name. When you say “new line,” the text moves down one line, whereas saying “new paragraph” moves it down two lines.
Dictation is not intended to be a full-fledged accessibility function. To use your voice to manage your Mac and apps, go to Accessibility and enable Voice Control, which we’ll go over shortly.
How to enable Dictation on macOS Ventura
You can dictate text anyplace you can enter text with a keyboard, such as documents, messages, and emails, if you choose not to write. This tutorial will walk you through the process of dictating text with macOS 13 Ventura.
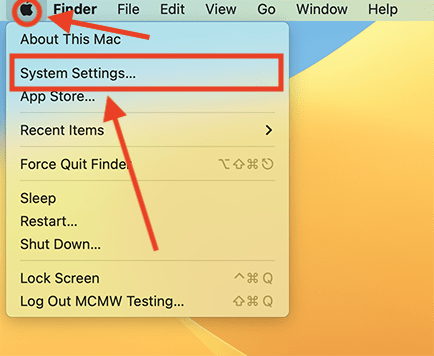
1. Go to System Settings
Select System Settings from the menu after clicking the Apple icon in the upper left corner of the screen.
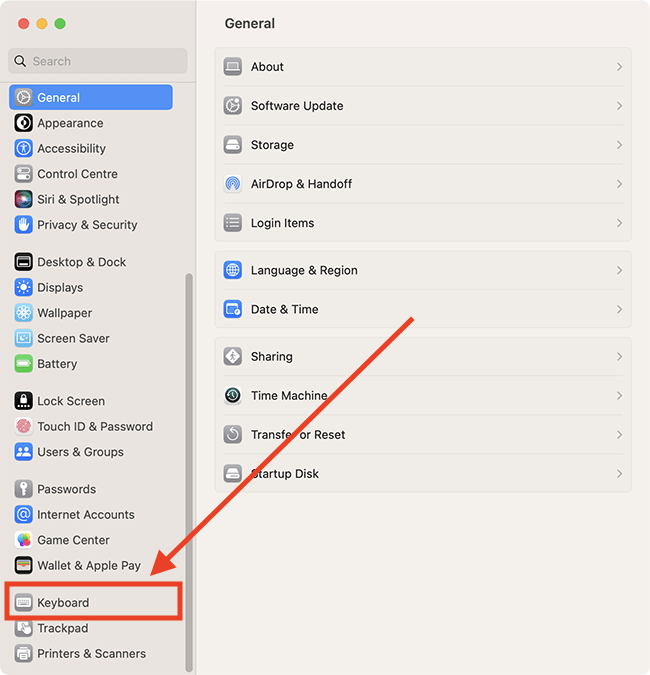
2. Navigate to the Accessibility menu
In the System Settings box, in the sidebar, click Keyboard.
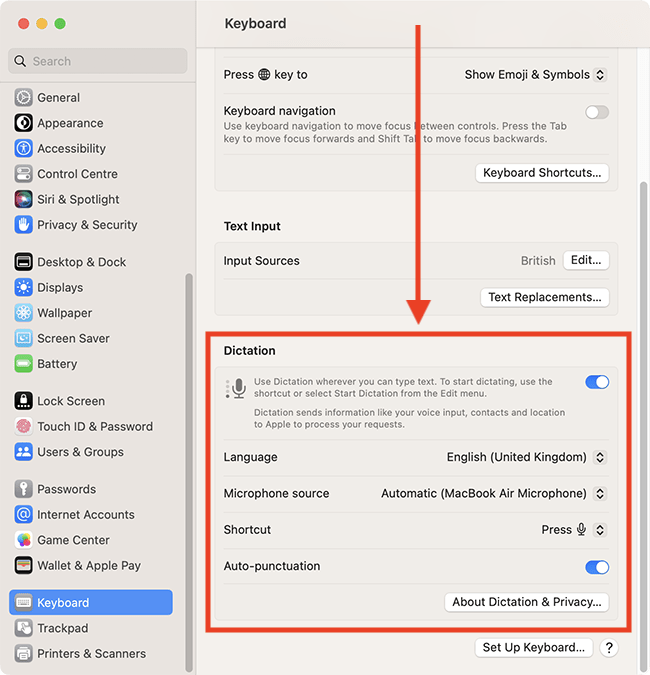
3. Locate the Dictation options
Scroll down to the Dictation section on the Keyboard page.
4. Enable dictation
Enable Dictation by clicking the Dictation toggle switch.
5. Change the microphone used for Dictation
If you have more than one microphone, you may select which one to use for dictation from the Microphone source drop-down option.
6. Set the Dictation keyboard shortcut
One method for starting Dictation is to use a keyboard shortcut. Click the Shortcut drop-down menu and select your chosen shortcut from the possibilities. If you select Customize, enter the key combination you want to use to begin dictation.
7. Using auto-punctuation
Dictation can insert punctuation for you as you speak. Set the Auto-punctuation toggle switch to on or off as needed.
8. Close System Preferences
When you’re finished, then click the Close button (red circle) in the top-left corner of the window or use the Cmd + W keyboard shortcut to exit System Settings.
9. Making Use of Dictation
Set the cursor to the location where you wish the dictated text to display. Start dictation by pressing the microphone icon in the row of function keys, or by using the dictation shortcut, or by selecting Edit > Start Dictation.
You can begin dictating your content after the dictation feedback window (a microphone with a changing sound level indication) displays.
If auto-punctuation is disabled, you can enter punctuation by specifying the sort of punctuation you want to use, such as “full stop” for ‘.’ or “question mark” for ‘?’. The whole list of punctuation commands may be found on Apple’s dictation support page: https://support.apple.com/en-gb/guide/mac-help/mh40695/mac when you’re done presses the dictation keyboard shortcut or Return key, or click done in the dictation feedback window.
Note:- If this does not work, it is possible that your computer settings are being managed by someone else (an IT department or administrator for example).If this is the case, you will need to contact them to gain access to these settings or for assistance.
Conclusion
Thus, after following the above steps about How to use Dictation on macOS Ventura. For Further Assistance, you can call us at +1-888-652-9580. You can also connect with us via dragon naturally speaking support. It is our free tech support service. We have 5 Years experience in all Nuance product & services. Please call our Nuance Dragon Naturally Speaking Tech Support to explore our wide range of services.
Related Articles
- Transfer Nuance Dragon to updated windows
- Nuance Dragon Professional Individual 14 Download
- Transcription Software Convert Audio to Text
- Dragon Naturally Speaking Crack 15.60 with serial keys
- Resolve Nuance Dragon Failed in Upgrading the User Profile issues..
- 7 Best Free Dictation Software for Windows and Mac
- Dragon NaturallySpeaking Home Vs Premium
- Dragon Naturally Speaking Commands List


